Photographing the Northern Lights in Lofoten: Settings, Gear, and Mistakes to Avoid
What camera settings work for photographing the northern lights?
Start around ISO 1600–3200, an aperture as wide as your lens allows (f/2.8 or wider is ideal), and a shutter speed of 5–15 seconds, adjusting from there based on how bright and fast-moving the aurora is. A sturdy tripod and manual focus set to infinity matter more than any single setting.
The two things that matter before any camera setting
Before getting into ISO and shutter speed, it’s worth being blunt about what actually determines whether you get a photo at all: a dark sky and a clear one. The northern lights complete guide covers the seasonal window in detail — roughly September to early April here — but no camera setting compensates for cloud cover or a sky that never gets properly dark. Check the forecast, then check it again closer to the time; conditions in this part of Norway shift within an hour, and a clear evening can cloud over before you’ve set up a tripod.
With that out of the way, here’s what actually helps once you’re standing under a clear, dark sky with the aurora showing.
Minimum gear that actually matters
You don’t need professional equipment to get a usable aurora photograph, but a few things aren’t optional:
- A camera capable of manual mode. Most mirrorless and DSLR cameras qualify; some higher-end smartphones now have a genuine manual or “night” mode capable of long exposures, though results vary widely by model.
- A tripod. This is the single most important piece of gear on this list. Aurora photography relies on exposures measured in seconds, and handheld shots at that shutter speed are unusable. A lightweight travel tripod is enough — it doesn’t need to be heavy-duty, just stable in wind.
- A wide-angle lens with a fast aperture. Something in the 14–24mm range at f/2.8 or wider lets in enough light to keep exposure times reasonable and captures more of the sky, which matters when the aurora spans a wide arc overhead.
- Spare batteries. Cold drains batteries fast, and Lofoten’s winter temperatures — typically 0 to −3°C, though colder inland — will cut battery life noticeably. Keep spares in an inside pocket, not in a camera bag left outside.
- A remote shutter release or the camera’s self-timer. Pressing the shutter button directly introduces shake at these exposure times; a 2-second timer delay solves this without extra gear.
Camera settings to start from
There’s no single correct setting — aurora brightness and speed of movement vary hugely from one night to the next — but these are reasonable starting points to adjust from once you see what the sky is doing:
| Setting | Starting point | Why |
|---|---|---|
| Mode | Manual | Auto modes misjudge exposure badly in near-darkness |
| ISO | 1600–3200 | Balances sensitivity against visible noise; raise it if the aurora is faint, lower it if it’s bright and fast |
| Aperture | f/2.8 or as wide as available | Lets in more light without needing an excessively long exposure |
| Shutter speed | 5–15 seconds | Shorter exposures freeze more structure in a fast-moving aurora; longer exposures suit fainter, slower displays |
| Focus | Manual, set to infinity | Autofocus fails in the dark; focus on a distant light or star in daylight beforehand and tape the ring if needed |
| White balance | Around 3500–4000K, or shoot RAW | RAW files let you adjust color afterward without committing in the field |
Shoot in RAW format if your camera supports it. It gives far more flexibility to correct exposure and color balance afterward, which matters because getting both exactly right in the field, in the cold, in the dark, is harder than it sounds.
Mistakes that ruin an otherwise clear night
- Not testing your setup before the aurora appears. Arrive at your spot, frame a composition, and take a few test shots of the stars while you wait. Fumbling with settings for the first time once the lights show up costs you the best minutes of a display.
- Leaving autofocus on. It will hunt uselessly in the dark and either fail to lock focus or focus on nothing. Switch to manual and set focus in daylight or on a bright star.
- Underestimating the cold. Frozen fingers make fiddling with dials and menus slow and error-prone. Gloves that allow some dexterity, or fingerless gloves under mittens, are worth the setup time.
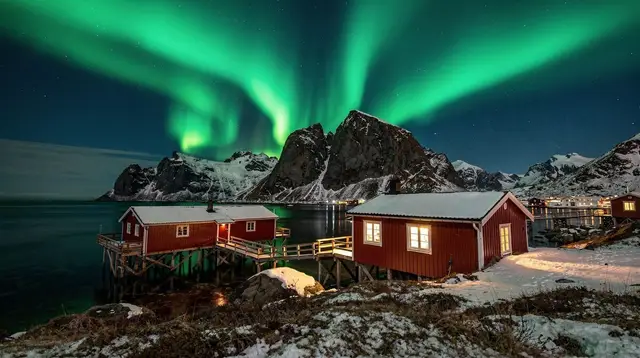
- Chasing a spot with no foreground. A photo of aurora and nothing else reads flat. Composing with a recognizable Lofoten landmark in frame — a peak, a rorbu, the water at Uttakleiv or Haukland — gives the image scale and place. Our photo spots guide for Reine and Hamnøy covers specific compositions in that area.
- Standing too close to town lights. Even modest light pollution from Svolvær or Leknes washes out fainter aurora structure. Driving even 15–20 minutes out of town, toward somewhere like Eggum or the road past Skagsanden, makes a visible difference.
- Giving up after one cloudy night. The aurora season runs roughly six months; a single clouded-over evening isn’t representative of your whole trip if you’re staying more than a couple of nights. See best time to visit for how to plan around this realistically.
Guided tour or DIY: the photography angle specifically
Photographing the aurora solo means you control your own composition, timing, and location, but you’re also responsible for finding clear sky and a safe, legal spot to park and shoot from — not trivial on unlit rural roads in winter. A guided northern lights hunt built specifically around getting usable photos puts an experienced local driver in charge of chasing clear sky across the region and often includes basic camera help for people photographing the aurora for the first time.
For a lower-key alternative that pairs sightseeing with the aurora chase rather than treating photography as the sole focus, a northern lights cruise from Svolvær gets you onto the water rather than a minibus, which changes the kind of foreground and reflection shots available. Our tour vs. DIY comparison weighs the tradeoffs in more depth, and the best spots for northern lights guide lists specific locations across the archipelago worth scouting in daylight before you commit to shooting there after dark.
Matching your settings to what the sky is actually doing
The aurora doesn’t behave the same way from one night to the next, or even from one minute to the next on the same night, and the settings above are only a starting point precisely because of that. A faint, slow-moving glow low on the horizon — often the first sign of activity before anything more dramatic develops — usually needs the longer end of the shutter speed range, closer to 10–15 seconds, to gather enough light to register clearly, and a higher ISO within the 1600–3200 range to compensate. Distinct pillars or rays reaching upward, and fast-moving curtains that ripple visibly to the naked eye, call for the opposite adjustment: dropping toward 5 seconds or even shorter if your aperture and ISO allow it, since a long exposure will blur that movement into a soft, shapeless glow rather than preserving the structure that makes the display worth photographing in the first place.
A sudden brightening — sometimes called a substorm, when a previously modest display flares rapidly overhead — is the moment most likely to catch a photographer off guard, and it’s worth having a plan for it before it happens rather than fumbling with settings while the best few minutes of the night pass by. Dropping ISO and shutter speed together as the sky brightens keeps the exposure from blowing out into a featureless white-green wash, and checking your camera’s histogram, not just the preview image on a small screen in the dark, is the more reliable way to judge this in the moment. Corona displays, where the aurora appears to radiate from directly overhead, are a specific case worth knowing about in advance: they require pointing the camera near-vertically and using the widest lens available, since a standard wide-angle composition aimed at the horizon will miss the display entirely.
Keeping gear working in the cold
Camera electronics generally tolerate Lofoten’s typical winter range without failing outright, but a few practical issues come up often enough to plan for. Moving a cold camera into a warm car, room, or bag causes condensation to form on and inside the body as it warms, and that moisture can linger on lenses and viewfinders for longer than expected, sometimes fogging a lens right when the aurora reappears after a short warm-up break. Sealing the camera inside a bag before bringing it indoors, and letting it reach room temperature gradually while still sealed, reduces this considerably compared to exposing a cold body directly to warm, humid air.
Battery behavior in the cold is worth planning for beyond simply packing spares. A battery that reads as nearly depleted after an hour outside in freezing temperatures often recovers a meaningful amount of charge once warmed back up in an inside pocket, which is why swapping a “dead” battery for a spare and warming the first one against your body rather than discarding it as finished can effectively double your night’s shooting time without carrying extra weight. Screens also respond more sluggishly to touch and dim further in extreme cold, so relying on physical dials rather than touchscreen menus for critical adjustments — ISO, shutter speed, aperture — is worth practicing at home before you’re doing it with cold hands in the dark. Our packing guide for Lofoten covers the broader clothing and layering side of staying comfortable enough, for long enough, to actually get the shot.
Editing without overdoing it
Shooting RAW only pays off if the editing afterward respects what the sensor actually captured rather than pushing it past what looks credible. The single most common editing mistake with aurora images is oversaturating the green channel until it reads as a flat, uniform neon color rather than the more layered, sometimes yellow-green or pink-tinged display the camera actually recorded — a moderate saturation adjustment, checked against how the display looked in the moment, holds up better over time than a heavily stylized edit that looks impressive on a small phone screen and artificial on anything larger. White balance is worth revisiting in post rather than locking in in the field: a slightly warmer or cooler adjustment than your in-camera setting can bring out color variation in the display that a single fixed setting misses, especially in images that mix aurora light with a cooler ambient night sky.
Noise reduction is the other area worth using with restraint. High-ISO night images inevitably carry visible noise, and aggressive noise reduction smooths it away at the direct cost of fine detail in the aurora’s structure — the same rippling texture that separates a striking image from a flat green smear. Applying noise reduction selectively, more heavily in the darker sky areas and lightly if at all across the aurora itself, generally preserves more of what made the photo worth taking than a single blanket setting applied to the whole frame.
Shooting alongside other people
Aurora photography in Lofoten is rarely a solitary activity, whether you’re on a guided tour with a group or simply sharing a popular pullout with other independent travelers on a clear night. Phone screens and headlamps used at full brightness are the most common source of frustration in a shared spot, since both ruin the night vision everyone present has spent twenty minutes building up, and a bright light appearing mid-exposure in someone else’s frame can ruin a shot they’ve been waiting all evening for. Switching a phone to its lowest brightness or a night-shift mode, and using a headlamp’s red-light setting rather than white when one is available, costs you almost nothing in practical terms and makes a real difference to everyone else’s results, including your own once your eyes have adjusted.
On a guided tour specifically, it’s worth asking the driver or guide early in the outing how they’d like the group to handle lights and phone use once the aurora appears, since operators running these trips regularly have usually settled on an approach that balances safety — walking around an unfamiliar dark site — against protecting everyone’s night vision and photographs. Arriving with this sorted out in advance, rather than negotiating it in the moment once the display is already underway, tends to leave more of the display’s best minutes actually available for photography rather than lost to avoidable disruptions.
Aurora photography questions answered
Can I photograph the northern lights with just a smartphone?
Some recent smartphones with genuine manual or night modes can capture a visible aurora, particularly a bright one, though results are generally less detailed than a dedicated camera. A tripod or stable surface is still essential regardless of what you’re shooting with.
What ISO should I use for aurora photography?
A starting point of ISO 1600–3200 works for most conditions, adjusted down if the aurora is bright and fast-moving, or up if it’s faint. There’s no single correct value — check your results and adjust in the field.
Do I need a full-frame camera?
No. A crop-sensor mirrorless or DSLR camera with a fast, wide lens produces perfectly usable aurora photographs. A full-frame sensor helps in low light generally, but it isn’t a requirement.
How do I focus in the dark?
Set focus manually to infinity, ideally checked in daylight or on a distant light or bright star, since autofocus systems generally fail to lock in near-total darkness.
Why do my aurora photos look green but the sky looked mostly grey to my eyes?
Cameras are more sensitive to the aurora’s green wavelength than human night vision is, especially in long exposures. A dim aurora that looks like a pale grey-green haze to the naked eye often renders as a clear, saturated green in a photograph — this is normal, not a camera fault.
Is a tripod really necessary?
Yes. Exposures of several seconds cannot be held steady by hand, and a blurred aurora photo is one of the most common disappointments among first-time visitors. A lightweight travel tripod is sufficient.
Northern lights tours in the Lofoten Islands on GetYourGuide
Verified deep-linked GetYourGuide tours. Book through these links and we earn a small commission at no cost to you.
Photos show the destination, not the operator's own images.