A Photography Guide to Lofoten: Viewpoints, Timing, and Light
What makes Lofoten photography different from other landscapes?
Extreme, season-dependent light: near-endless golden hour under the midnight sun in summer, long blue-hour twilight around midday in deep winter, and weather that can change within an hour regardless of season. The same viewpoint can look completely different an hour apart.
Lofoten photographs well almost anywhere along the E10, which is part of the problem: with so many strong compositions available, it’s easy to spend a trip driving past viewpoints rather than being in the right one at the right time. This guide is organized around that timing question — which views are worth planning your day around, and when the light actually favors them — rather than a simple list of pretty places.
The view that defines Lofoten: Hamnøy and Reine
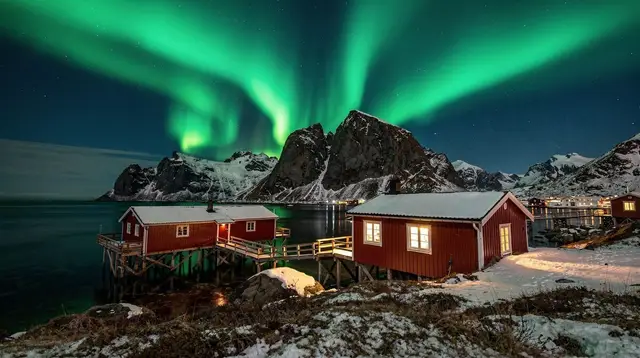
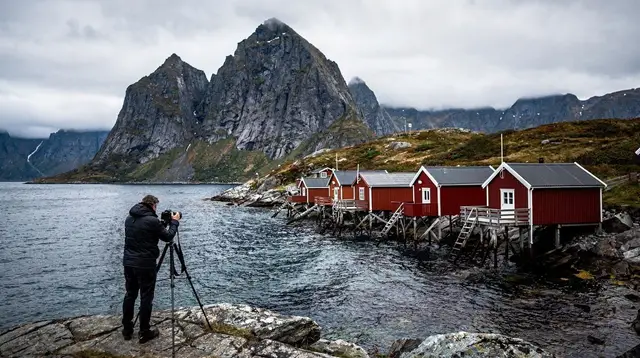
If you’ve seen a single photograph of Lofoten before visiting, there’s a good chance it was taken from the bridge or roadside above Hamnøy, looking across the water at its cluster of red rorbuer with the peaks behind Reine rising steeply beyond. It’s the archipelago’s most reproduced image for a reason: the composition genuinely holds up, with the fishing village, the water, and the mountains stacked in a way that reads clearly in any light.
That popularity means the viewpoint gets crowded around sunrise and sunset in peak season. Arriving earlier than planned, or working the angle from slightly further along the road, is usually enough to get space to work. For a closer breakdown of this specific stretch of coastline, our guide to photo spots around Reine and Hamnøy goes further than we can here.
Reinebringen: the view from above
The classic Hamnøy shot is taken from water level; the view from above, atop Reinebringen, reframes the same landscape entirely. Reaching the summit means climbing roughly 1,566 stone steps built into the mountainside — a serious, sustained ascent rather than a casual walk, and one that should be planned around daylight, weather, and your own fitness rather than around a sunset schedule alone. Our hiking safety and best hikes guides cover what that climb actually involves; treat the summit view as a bonus you earn on a clear day, not a guaranteed shot.
Sakrisøy and the colors of a working fishing village
A short distance from Hamnøy, Sakrisøy offers a different kind of composition: closer, more intimate shots of individual buildings and boats rather than a wide landscape. It rewards slower work — walking the small settlement rather than shooting from a single fixed point — and pairs naturally with a Hamnøy and Reine circuit on the same day, since all three sit within a few minutes of each other by road.
Henningsvær: a village built on scattered islets
Henningsvær, further along on Austvågøya, offers a completely different geometry: a fishing village spread across small connected islets rather than clustered against a single mountain backdrop. Its well-known football pitch, wedged between the harbor and the open sea, is a favorite subject on its own, and the drone or elevated shots that show the village’s odd, fragmented layout are best planned for calm, clear conditions rather than attempted in poor visibility. The story behind the pitch is worth reading before you go, if only to understand what you’re actually looking at once you arrive.
Beaches: Kvalvika, Uttakleiv, Haukland, and Unstad
Lofoten’s beaches offer a third register entirely — wide sand, scattered boulders, and open sky, closer to a coastal landscape than a fishing-village scene. Kvalvika, reachable only on foot from Fredvang with the Ryten summit above it, rewards photographers willing to hike in for a more isolated composition. Uttakleiv and Haukland are far more accessible by car and popular at both sunrise and sunset for their open, west-facing horizons. Unstad, better known for arctic surfing, adds moving subjects — surfers in the water — to an otherwise similar beach composition.
Eggum and Nusfjord: open coast versus a preserved village
Eggum, further along the same coastline, faces open sea with minimal development in view, useful for photographers who want a composition without any human structures at all — or, at night, one of the darkest, most open skies in the region for aurora photography. Nusfjord, by contrast, is a preserved fishing village with a paid entry fee, offering tightly composed shots of historic buildings and a working harbor without the wider development seen elsewhere.
The Trollfjord: a different kind of frame
The Trollfjord, a narrow sea arm roughly two kilometers long with an entrance only around a hundred meters wide, is usually photographed from a boat rather than land, since the steep walls that define it are best appreciated from the water looking up. A boat trip built around photography, rather than sightseeing generally, makes better use of the light:
a private photo tour covering Hamnøy and Reine is one option if you’d rather work with a local photographer’s guidance than plan every stop yourself.
Light by season: the real variable
The biggest difference between a summer and winter photography trip to Lofoten isn’t the scenery — it’s the light itself.
| Season | Light pattern | Practical implication |
|---|---|---|
| Midnight sun (late May–mid-July) | Sun stays low and golden for hours, doesn’t fully set | Golden hour stretches through the night; no true darkness for stars or aurora |
| Autumn / spring (Sept, March–April) | More typical sunrise/sunset windows | Predictable golden and blue hour, plus a chance at the aurora after dark |
| Winter (Nov–Feb) | Sun stays very low, long blue-hour twilight around midday | Short usable daylight, but soft, long-lasting light when it happens |
| Polar night (~Dec 6–Jan 6) | No sunrise at all | Photography shifts toward blue-hour and aurora work rather than sunlit landscapes |
A multi-day trip built specifically around this timing, rather than a single pass through the region, gives the best odds of catching each location in strong light. Our photography-focused 6-day itinerary is structured with exactly that flexibility in mind:
a 3-day guided photo tour covering Lofoten’s top highlights is a useful option for visitors who’d rather have someone else manage the timing and locations across several days.
Weather: the constraint every plan needs
As throughout Lofoten, weather can change within an hour, which is as true for photography plans as for hiking or boat trips. A clear forecast for sunset can turn to fog by the time you arrive, and a cloudy morning can open into strong light an hour later. Building slack into a photography itinerary — an extra day per major viewpoint, rather than one fixed slot — is the most reliable way to work around this, more reliable than chasing a specific forecast.
For a guided alternative that handles routing and timing across the wider region:
a guided sightseeing photo tour and road trip across Lofoten combines transport with a photographer’s sense of when and where to stop, useful if you’d rather not manage weather-driven schedule changes yourself.
Equipment that earns its place in a Lofoten kit bag
A landscape-focused trip here rewards a slightly different equipment list than a typical scenic road trip, mostly because of how quickly conditions shift. Wind is the constant to plan around: a tripod that felt sturdy on a calm afternoon can hunt and vibrate on an exposed headland or beach once the wind picks up, so a heavier tripod, or at minimum one you’re prepared to weigh down with a bag hung from the center column, holds a sharper image than a lightweight travel model in genuinely gusty conditions. A polarizing filter earns its place for water-heavy compositions — cutting glare off the fjord surface at Hamnøy or Reine, or reducing reflection on wet rock along the beaches — though it’s worth removing for any shot where you actually want the reflection itself, since a polarizer can strip out exactly the effect a composition is built around.
Rain and spray protection matters more here than in most landscape destinations, given how often precipitation and clear spells trade places within the same afternoon. A simple rain cover for the camera, and a microfiber cloth kept somewhere genuinely accessible rather than buried in a bag, solves most of the problem of shooting through a fine drizzle or salt spray near the coast. Lens changes in the field are worth minimizing in these conditions — swapping glass in blowing spray or rain risks getting moisture on the sensor in a way that’s far more disruptive than simply working with whatever’s already mounted until you’re back in the car.
Working with water and reflection
Lofoten’s photography leans heavily on water as a compositional element, and understanding how to use it changes results more than most camera settings do. Flat, still conditions — most likely early morning before wind builds, or in a sheltered spot like the water around Hamnøy and Reine — produce the mirror-like reflections that define many of the region’s best-known images, doubling the mountain backdrop in the water below and giving an otherwise simple composition real depth. The same location in choppier conditions loses that reflection entirely, replaced by a more textured, broken surface that suits a different kind of image — moodier, more dynamic, less postcard-like — rather than being a failed version of the calm shot.
Tide matters too, particularly on the beaches, since a receding tide leaves wet sand that reflects sky color in a way dry sand simply doesn’t, effectively doubling the color and light in a foreground shot without any special equipment. Checking tide timing alongside sunrise and sunset, rather than treating them as unrelated variables, is a small planning step that measurably changes what’s possible at a beach location on a given morning.
Drone photography: what to check before you fly
Aerial perspectives suit Lofoten’s geography particularly well, given how much of the region’s character comes from the relationship between water, village, and mountain that’s hard to fully capture from ground level — Henningsvær’s scattered islets are the clearest example, since the layout that makes the village distinctive is genuinely difficult to read from a single ground-level vantage point. That said, drone use in Norway is subject to national aviation rules and local restrictions that can apply near settlements, protected natural areas, or seasonal wildlife closures, and those rules can differ from what a visiting photographer might be used to at home. Checking current regulations before travelling, rather than assuming a drone is welcome anywhere a ground camera would be, avoids both legal trouble and the more basic problem of disturbing nesting birds or other wildlife during sensitive periods.
Wind is the more immediate practical obstacle to actually flying once permissions are sorted out. Lofoten’s open, mountainous terrain channels and accelerates wind in ways that aren’t always obvious from ground level, and a launch site that feels calm can sit directly beneath much stronger air a hundred meters up. Building in patience for genuinely still conditions, rather than launching the moment ground-level wind looks manageable, is worth it given how quickly a drone can become difficult to control in air that’s rougher than it appeared.
Processing for Lofoten’s high-contrast light
Editing choices worth planning for follow directly from the kind of light the region produces. Winter’s low sun and long twilight generate a high dynamic range between bright sky and shadowed foreground more often than midday summer light does, and pulling detail back into blown-out sky or blocked-up shadow in post generally serves an image better than pushing contrast further, which is the more common instinct. Shooting RAW, as with aurora work, preserves the flexibility to make that recovery without visible quality loss, whereas a JPEG straight out of the camera in high-contrast conditions often leaves little to work with in either direction.
Color temperature is worth revisiting deliberately rather than trusting auto white balance uniformly across a shoot, since the same scene photographed at midday under flat winter light, at golden hour, and under the pink-tinged blue hour that follows sunset in this region will each call for a different correction to look natural rather than uniformly cool or warm. Comparing a handful of images from the same location across different light conditions, side by side, is a useful way to calibrate your own sense of what looks accurate versus what looks merely pleasant but false to the scene as it actually appeared.
Frequently asked questions about photographing Lofoten
What is the single most photographed viewpoint in Lofoten?
The view of Hamnøy’s red rorbuer against the mountains behind Reine, usually shot from the bridge or the road above the village. It’s iconic precisely because the composition is genuinely strong, not because of any trick of angle.
What’s the best time of day to photograph Lofoten?
It depends on the season. In winter, the low sun stays close to the horizon for hours around midday, producing long golden and blue light; in summer, the midnight sun stretches golden hour into the small hours of the night instead of concentrating it at dawn and dusk.
Do I need a car to reach Lofoten’s photography spots?
For most of them, yes. A handful of viewpoints are visible from the E10 itself, but the best light often means being in position before or after normal opening hours, which is far easier with your own rental car than relying on tours or buses.
Is Lofoten a good destination for northern lights photography specifically?
Yes, from roughly September to early April, but it’s a distinct skill from daytime landscape work — see our dedicated guide to photographing the northern lights for that side of it.
How much time should a photography-focused trip allow?
More than a typical sightseeing trip. Weather can block a planned shoot for a day or more, so building in flexible extra days, rather than a single pass through each viewpoint, meaningfully improves your results.
Are the classic viewpoints crowded?
The best-known ones — Hamnøy, Reinebringen’s summit, Henningsvær — attract other photographers, especially around sunrise and sunset in peak season. Arriving early or choosing a slightly less obvious angle nearby usually solves this.
Photography tours on GetYourGuide
Verified deep-linked GetYourGuide tours. Book through these links and we earn a small commission at no cost to you.
Photos show the destination, not the operator's own images.